• Home
  • My bio & building philosophy
  • Instrument Making Supplies For Sale
    • Guitar Sets For Sale
    • Ukulele Sets For Sale Page 1 >
      • Ukulele Sets For Sale Page 2
      • Ukulele Sets Page 3
      • Ukulele Sets For Sale Page 4
      • Ukulele Sets For Sale Page 5
      • Ukulele Sets For Sale Page 6
      • Orphan Ukulele Sets
      • Ukulele Sets For Sale Page 8
    • Curly Koa Binding & Headcaps For Sale
    • Ukulele Building Plans
    • Koa & Rosewood Slotted Ukulele Fretboards
    • Ukulele & Guitar Pickups
    • Lap Steel Guitar Supplies
  • Instrument Orders
  • Website Directory
  • Soprano Ukuleles
  • Concert Ukuleles
    • Concert Ukuleles Page 2
    • Concert Ukuleles Page 3
    • Concert Ukuleles Page 4
    • Concert Ukulele 9/2019
  • Tenor Ukuleles
    • Tenor ukuleles page 2
    • TENOR UKULELES PAGE 3
    • Tenor Ukuleles Page 4
    • Curly Mango Tenor Ukulele For Sale 2/14/16
    • Sandelwood Tenor Ukulele For Sale
    • Tenor Ukulele 8/1/16
    • Tenor Ukulele 10/2/16
    • Natural Series Tenor Ukulele For Sale August 2019
    • Curly Koa Tenor Ukulele 3/19
    • Milo Tenor Ukulele
    • Tenor ukulele Page 3
    • Recycled Redwood Tenor Ukulele
    • Traditional tenor 9/2019
  • Archtop Ukuleles
  • Archtop Guitars
  • Acoustic Guitars
    • Naio Guitar
    • Milo Guitar For Sale
  • Lap Steel Guitars
    • Mango Lap Steel Guitar For Sale
    • Koa Lap Steel Guitar For Sale
  • Electric Guitars
  • Articles of interest to builders
    • Making a drill press powered radius jig
    • The Moxon Vise
    • Making a Notched Fretboard Straight Edge
    • Soundport Construction
    • Bending Curly Binding
    • Making Go Bars
    • How to tie the 3 hole bridge
    • Radius Brace Making
    • Inlay Techniques
    • Joining Tops & Backs
    • How I Bend Guitar & Ukulele Sides
    • Shaping Kerfing
    • Uke neck making
    • Neck Removal
    • Shop Tips
    • Tablesaw zero throat jig for binding and kerfing
    • Resawing 1
    • Slotting Fretboards
    • neck heel carving jig
    • A Subjective Glue Test
  • About Koa
    • Growing Koa
    • Milling Logs
    • Planting Koa
    • The Koa Forest
  • Contact info
  • Shop Projects
  • New Instruments For Sale
  • Brazilian Rosewood Tenor for sale
  • Pegasus Logo T-Shirts
  • New Natural Series Tenor Ukulele 1
  • New Natural Series Tenor Ukulele #2
  • Natural Series Classic Tenor ukulele November 2019
  • New Natural Series Classic Tenor Ukulele 4/24/19
  • "0" Size Acoustic Guitar 2019
  • Natural Series Tenor Ukulele For Sale 05/2019
  • Life Outside of Lutherie
  • Life Outside of Lutherie Page 2
  • Ordering a Natural Series Tenor Ukulele
  • Plants
  • Tenor Ukulele For Sale 1/31/2020
  • Sharpening Ultimate Scrapers
  • Curly Koa Tenor Ukulele For Sale March 2020
  • Current Shop Projects
  • Natural Tenor Ukulele For Sale 6/2020
  • Soprano Uke 6/2020
  • Kerfing Page 2
  • New Classic Model Tenor Ukulele 9/2020
  • Traditional Tenor Ukulele 10/2020
  • Artist Series Tenor 10/2020
  • Builder's Supplies
  • Curly Redwood/Curly Myrtle Tenor Ukulele 1/18/20
  • Horses
  • Maple/Redwood Tenor Ukulele
  • grinder
  • New Uke April 10, 2021
  • Scott
  • Planing Small Pieces of Wood
  • New Curly Koa Traditional Model Ukulele For Sale 10/10/21
  • Kauri Tenor 10/11/21
  • Applying Wood Bindings
  • Neck
  • New Page
  • Pegasus Vintage Model
  • Building a Custom Guitar Page 2
  • All in a Days Work
  • Grover Tuners For Builders
  • Builders Closeout/Specials Page
  • Peter
  • Redwood/Milo Tenor Ukulele For Sale 2/16/23
  • Shaping a Bridge Sole
  • Sandlewood Concert Ukulele
  • Sandlewood Concert Ukulele
  • Sanadlewood Concert Ukulele For Sale
  • Sandlewood Concert Ukulele For Sale
  • Sandlewood Concert Ukulele For Sale
  • Sale Items
  • Other Craft Items For Sale
  • Guitar Sets For Sale Page 2
  • Orphan Wood Ukulele
  • Brazilian/Curly Koa Tenor
  • New tenor 11/11/24
Gluing Bridges

     I was asked about what clamps to use to glue a bridge on. I don't have an instrument in that part of the process right now, so I'll have to fake the photos a bit. Next time I glue a bridge I'll post a proper write-up
     I have tried all kinds of ways to do this, including vacuum clamping, making my own clamps, modifying commercial clamps, etc. I have settled on this process and it works for me. To begin with, the bridge must very closely match the top, which is usually slightly convex. If the top is concave, you have a problem with the construction of the instrument. If the wings of the bridge do not touch the convex top without using clamps, you need to sand/scrape the bottom until it fits. Some builders tape a piece of sandpaper on the top and slide the bridge back and forth on it to get the same curvature on the bridge as is on the top. I just use a sharp scraper blade instead. Once the bridge underside curve matches the top, I then scrape a few thousandths more off the bridge center so that the wings touch and there is a very slight gap in the middle of the bridge. This allows me to use just 1 clamp in the middle of the bridge. If the wings are floating free and not touching the top, the bridge will most likely come off or you will distort the top. You can't just clamp the wings down with force. It generally does not work.

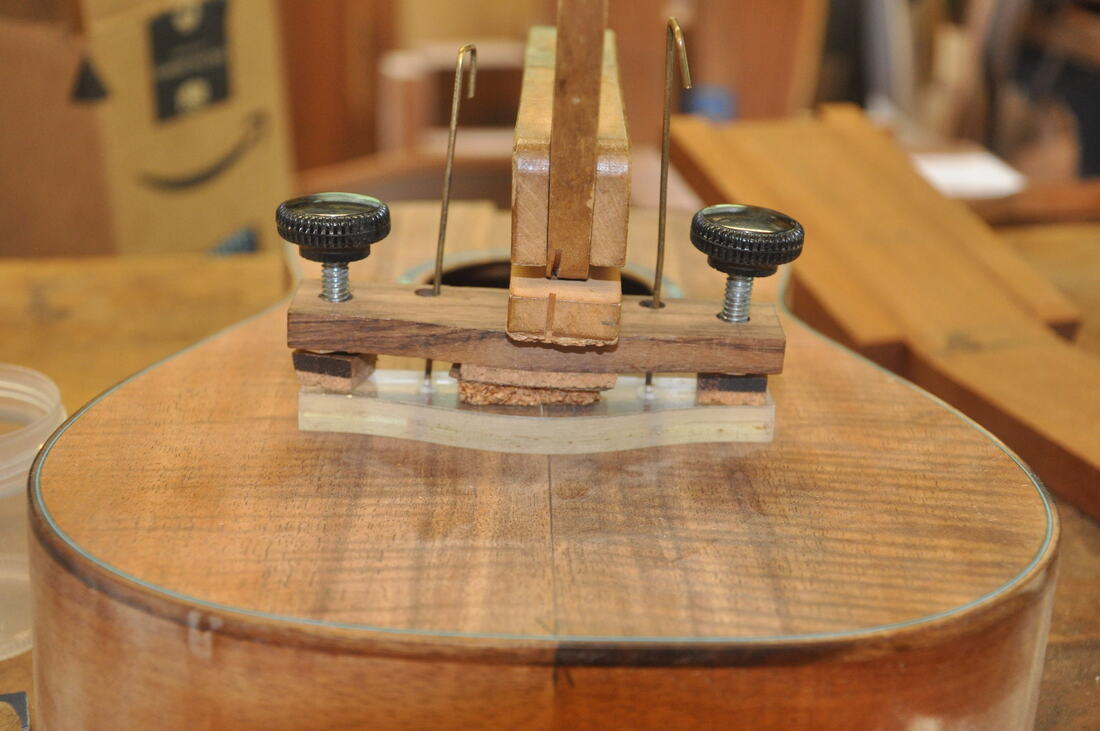
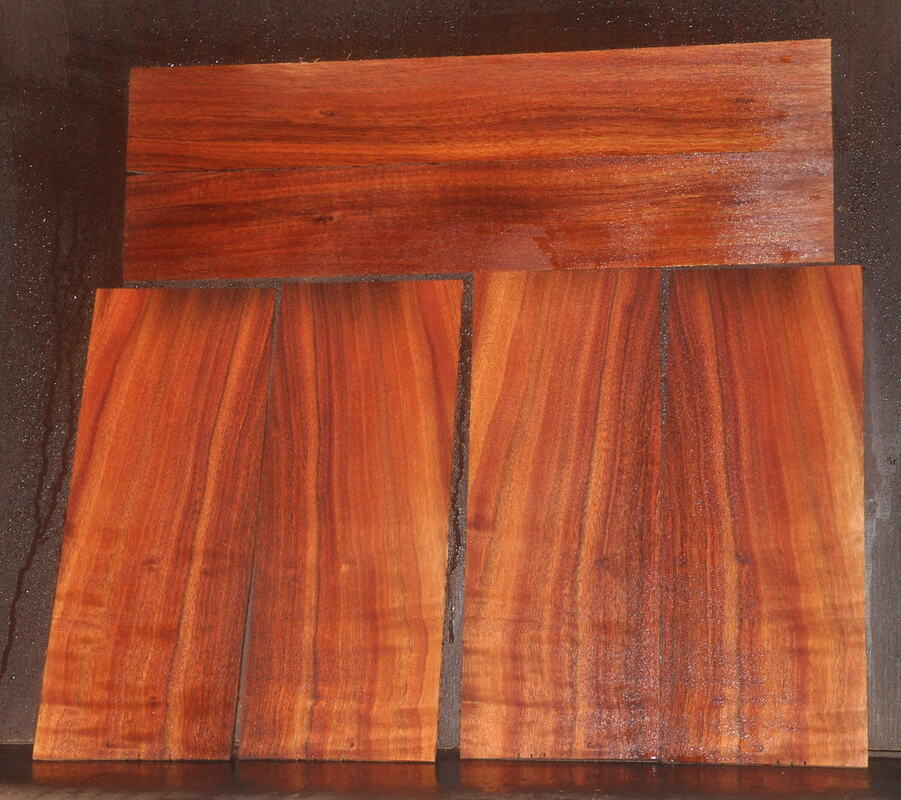
     I use a simple shop made jig and a single 6" cam clamp that has been bandsaw to clear the braces.Nothing elegant about the jig. I made it sometime ago, thinking I would make a nicer version, but it works and I just keep using it.The one I use is the funky little wooden one on the right. You can make it in a few minutes from a piece of hardwood, 2 T-nuts, and a couple of knobs with threaded shafts to fit the T-nuts or you could use hardware store bolts just as well. The extra holes in the top are for the 1/16" brass rod pins the go through the saddle slot to hold the bridge in place while gluing. The extra cork on the bottom is to raise the jig up to make glue clean-up easier. The 2 little squares of wood are padded with leather and will go on top of the wings. I have ground the threaded shaft ends into a cone shape and the ends will go into the shadow drilled holes on top of the wing caul squares. That holds them in place.
Picture
Picture
I'm just using a Plexiglas template as a mock bridge here
Picture
Here is the 6" cam clamp that has been modified to fit over the top braces.
Picture
Here is the jig in action. Camp the center cam clamp securely and then just lightly tighten down the wing clamps until you see a little glue squeeze out. This works for me every time. Good luck!--Bob
Picture
Picture

Website Directory
Proudly powered by Weebly