Resawing
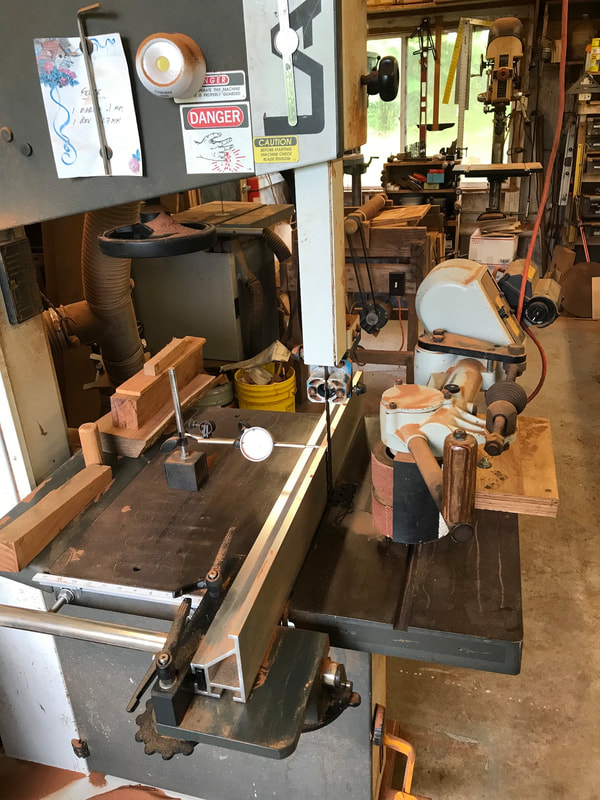
I resaw on a 24" Laguna bandsaw with ceramic guides. My resaw techniques will not work on small saws. You need a larger saw to get consistent, accurate slices. And, if you are doing a lot of resawing of high value wood, you also need a power feed. Unfortunately power feeds are very expensive and not many companies make them.Conisistent quality cuts and longer blade life depent on a constant stock.feed. You also need carbide or stellite tipped blades. You can do a little resawing with steel blades, but you need carbide or stellite tipped blades if you plan to do lot of resawing of hardwoods. I use 1" Lennox Woodmaster blades. My system works O.K. up to about 10"-12" in height on hardwoods. It prefers heights of less than 9". The setup I use is marginal, but it works.
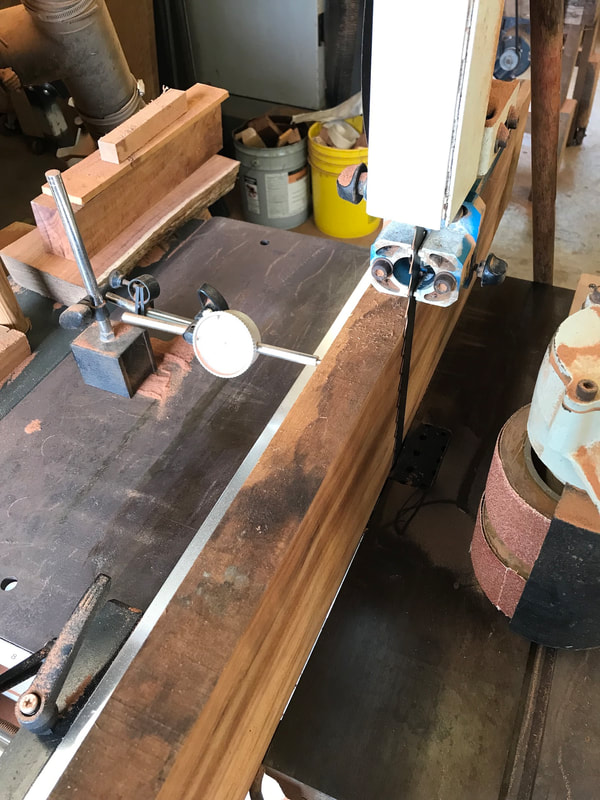
For the best resawing, you need to be taking your thin slices off the outside of the wood you are sawing, not between the fence and the blade. Against the fence you want a perfectly flay and square side that never changes. This system requires that the fence be moved on every cut, which is why I came up with this way of doing it. Cutting off the outside of the wood gives much more consistent veneers, and at least twice the blade life.
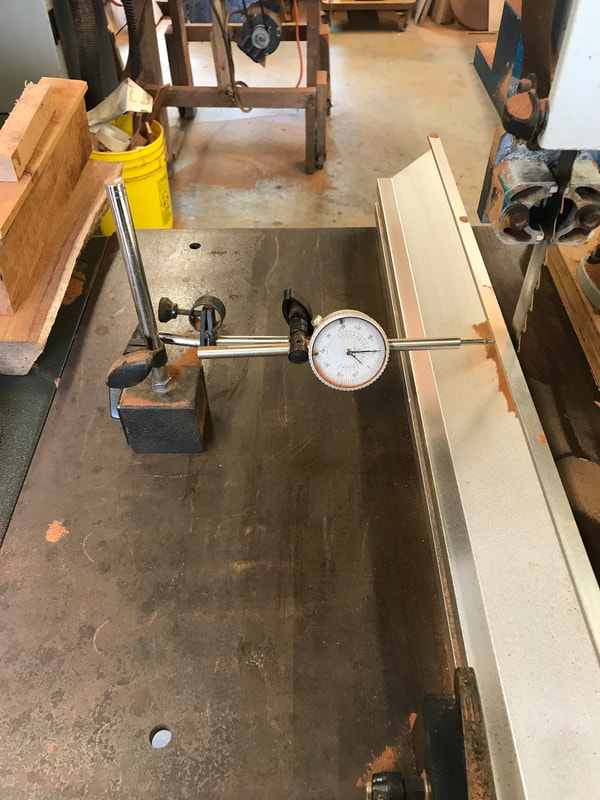
I use an after market Laguna Driftmaster fence because it has a crank system for moving the fence. Some saws come with similar systems. Moving the fence a few thousanths by hand with out a crank feed is difficult. Even with a crank feed, I quickly found that just counting the cranks did not produce consistent thickness veneers, so I have adapted to using a dial caliper. It works amazingly well.
I use a caliper mounted on a magnetic base. These calipers are very cheap. I started with the common caliper that usually has a 1" throw. I had to move the base every 3rd cut. Not really a problem, but I have changed to an indicator that has a 2" throw. Again, cheap. Around $35.00. I don't have to move it as much.
For the best resawing, you need to be taking your thin slices off the outside of the wood you are sawing, not between the fence and the blade. Against the fence you want a perfectly flay and square side that never changes. This system requires that the fence be moved on every cut, which is why I came up with this way of doing it. Cutting off the outside of the wood gives much more consistent veneers, and at least twice the blade life.
I use an after market Laguna Driftmaster fence because it has a crank system for moving the fence. Some saws come with similar systems. Moving the fence a few thousanths by hand with out a crank feed is difficult. Even with a crank feed, I quickly found that just counting the cranks did not produce consistent thickness veneers, so I have adapted to using a dial caliper. It works amazingly well.
I use a caliper mounted on a magnetic base. These calipers are very cheap. I started with the common caliper that usually has a 1" throw. I had to move the base every 3rd cut. Not really a problem, but I have changed to an indicator that has a 2" throw. Again, cheap. Around $35.00. I don't have to move it as much.
The dial indicator has revolutionized my resawing. No more guessing , well almost none. As with everything, there is a learning curve. It takes a little trial and error to figure out how much to move your fence on each cut. In my case, since I sell wood sets, I have to resaw thicker than I might for myself to give the inexperienced builder a little wiggle room. For the first cut, I move the fence so that the wood just fits between the blade and the fence. I then zero out my indicator and move the fence .300 for my first cut. I always cut the first piece slightly thick in case the outside of the board needs more clean-up. On the following cuts I move the fence .250-.260. Depends on how the blade is doing. With the powerfeed, I am able to push blades until they are are pretty dull. When they start to scream, and if you resaw then you know what I mean, I change out the balde. I do need to adjust the fence setting a bit for very dull blades. I sell my wood at 4mm, sanded both sides (Sorry to mix metric and Imperial, but that's the way I work. Metric is way better, but confuses a lot of folks.), which is why I have to resaw thicker than I might actually need to. I have sawn thousands of sets in my time, and wasted more wood than I like to think about by tring to resaw too thin. My approach is maybe I could get 3 sets out of that really nice piece if everything goes perfectly, but since it often does not it is better to get 2 sets than just 1 set because I was greedy!
So that's the simple resaw set-up for me. I personally don't think resawing is easy. It takes experience, patience, and luck!
So that's the simple resaw set-up for me. I personally don't think resawing is easy. It takes experience, patience, and luck!